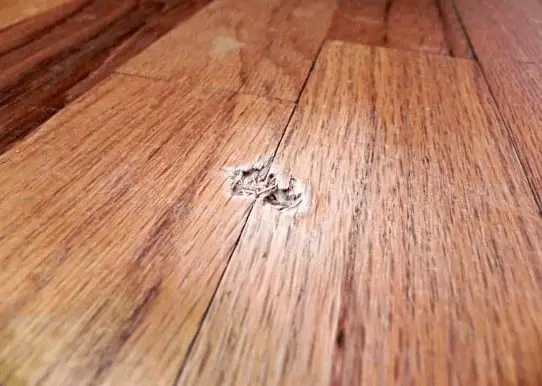
Picture this: You’re relaxing in your living room, enjoying a quiet evening with a good book, when suddenly, a heavy piece of furniture shifts and leaves a deep, ugly gouge in your beautiful wood floor. It’s a heartbreaker, right? But don’t despair! You don’t have to live with that eyesore forever. With a little patience and the right tools, you can fix that gouge and restore your floor to its former glory.

Image: floorcarekits.com
Fixing a gouge in your wood floor isn’t just about aesthetics, it’s about saving you money. Replacing the entire floorboard can be costly and time-consuming. By learning the techniques to fill in the gouge, you can protect your investment in your home and extend the life of your floors. This guide will walk you through the entire process, step-by-step, so you can confidently tackle this repair yourself.
Prepare the Work Area
Before you begin the repair, it’s essential to create a safe and clean workspace. Start by clearing the area around the gouge of any furniture or obstacles. This will give you ample room to work and prevent accidental damage. Next, use a vacuum cleaner to remove dust and debris from the affected area. A clean work surface is crucial for achieving a smooth and even repair.
Assess the Damage
Now, take a close look at the gouge. Determine its depth and size. If the gouge is shallow, you can likely fix it with wood filler. However, if the gouge is deep or extends across the grain of the wood, you may need to consider a more involved repair, such as using a wood patch or inlay.
Cleaning the Gouge
Once you understand the severity of the damage, it’s time to prepare the gouge for repair. Use a small scraper or a utility knife to carefully remove any loose wood or debris from the gouge. Be gentle to avoid further damage. Following the scraping, use a damp cloth or a cleaning brush to thoroughly clean the gouge, removing any lingering dirt or dust.

Image: www.washingtonpost.com
Choosing the Right Wood Filler
The next step is selecting the right wood filler for your specific gouge. Wood fillers come in various formulas, including epoxy, polyester, and acrylic. Epoxy fillers are known for their strength and durability, making them ideal for deep gouges. Polyester fillers are a popular choice for their ease of use, while acrylic fillers are favored for their water resistance.
Consider the wood’s color when selecting the wood filler. If the gouge is in a stained or finished floor, choose a filler that closely matches the existing color. You can even tint some fillers to match your floor’s finish, offering a seamless repair.
Applying the Wood Filler
Before you begin, carefully read the instructions on your chosen filler. Typically, you’ll need to mix two components together to activate the filler. Use a small spatula or putty knife to apply the mixed filler to the gouge, pressing it firmly into the hole. Smooth out the surface of the filler, ensuring that it is even with the surrounding wood. Carefully remove any excess filler from the surface of the floor.
Allow the Filler to Dry
After applying the filler, let it dry completely according to the manufacturer’s instructions. Drying times can vary depending on the type of filler and the ambient temperature and humidity. It’s essential to allow the filler to harden completely before proceeding to avoid smudging or compromising the repair.
Sanding the Filler
Once the filler is dry, use sandpaper to smooth out any rough edges and blend the filler seamlessly with the surrounding wood. Start with a coarse grit sandpaper (around 80 grit) to remove any unevenness. Gradually transition to finer grit sandpaper (around 120 grit) to create a smooth surface. Finally, use a fine-grit sandpaper (around 220 grit) for a final polish.
Finishing Touches
If your floor is stained and finished, you’ll need to match the finish to the repaired area. Use a small brush to apply a thin coat of stain to the filler and surrounding wood, replicating the existing color. Allow the stain to dry completely before moving on to the next step.
Finally, apply a coat of polyurethane varnish or sealant to protect the repaired area and the rest of your floor. Apply two thin coats of varnish, allowing each coat to dry completely before applying the next. This will create a durable and protective layer, restoring your floor to its former beauty.
Expert Tips for a Flawless Repair
- Don’t rush the drying process. Allow the wood filler to dry completely before sanding. Rushing this step can lead to uneven sanding and a less-than-perfect repair.
- Use a damp cloth to clean the area before applying filler. This ensures the filler bonds properly to the wood surface.
- Use a sanding block or a piece of wood to help you maintain even pressure when sanding. This will prevent uneven sanding and scratches.
- Invest in a good-quality respirator mask when sanding. This will protect you from inhaling dust particles that can be harmful to your respiratory system.
How To Fix A Gouge In Wood Floor
Conclusion
Fixing a gouge in your wood floor doesn’t have to be a daunting task. By following these tips and using the right tools and materials, you can achieve a professional-looking repair that will blend seamlessly with your existing flooring. Remember, patience is key! Take your time and enjoy the process of restoring your floors to their original glory. Now that you’ve learned how to fix a gouge, you can confidently tackle any minor imperfections that may arise, keeping your home looking its best for years to come.


/GettyImages-173599369-58ad68f83df78c345b829dfc.jpg?w=740&resize=740,414&ssl=1)


