Have you ever stepped into a beautifully tiled shower and dreamt of transforming your own bathroom? Installing a tile shower floor is a project that can significantly upgrade the look and feel of your space, but it’s not for the faint of heart. It requires patience, precision, and some basic DIY skills. My own journey into the world of tile began with a disastrous attempt to re-tile my kitchen backsplash. Let’s just say I learned the value of planning and proper tools the hard way. However, after a lot of research and practice, I conquered that kitchen and now I’m here to help you tackle that shower floor.

Image: www.renovatorstore.com.au
This article will walk you through the process of installing a tile shower floor, from preparation to finishing touches. We’ll cover the tools you’ll need, the steps to follow, and common mistakes to avoid. While the process may seem daunting at first glance, by breaking it down into manageable steps, you can confidently transform your bathroom into a luxurious oasis.
Preparing the Shower Floor
The success of your tile installation depends greatly on a solid foundation. A properly prepared shower floor will ensure your tiles stay firmly in place and prevent future issues. This involves removing any existing flooring, leveling the subfloor, and waterproofing.
The first step involves removing the old shower floor, if applicable. This might involve chipping away tile or carefully dismantling a pre-existing shower pan. Once the subfloor is exposed, inspect it for any damage or rot. Replace any damaged sections with plywood or OSB board. Next, you’ll want to level the subfloor. This is crucial for a smooth and even tile surface. You can achieve this with a self-leveling compound or by using a leveling screed.
Creating a Waterproof Barrier
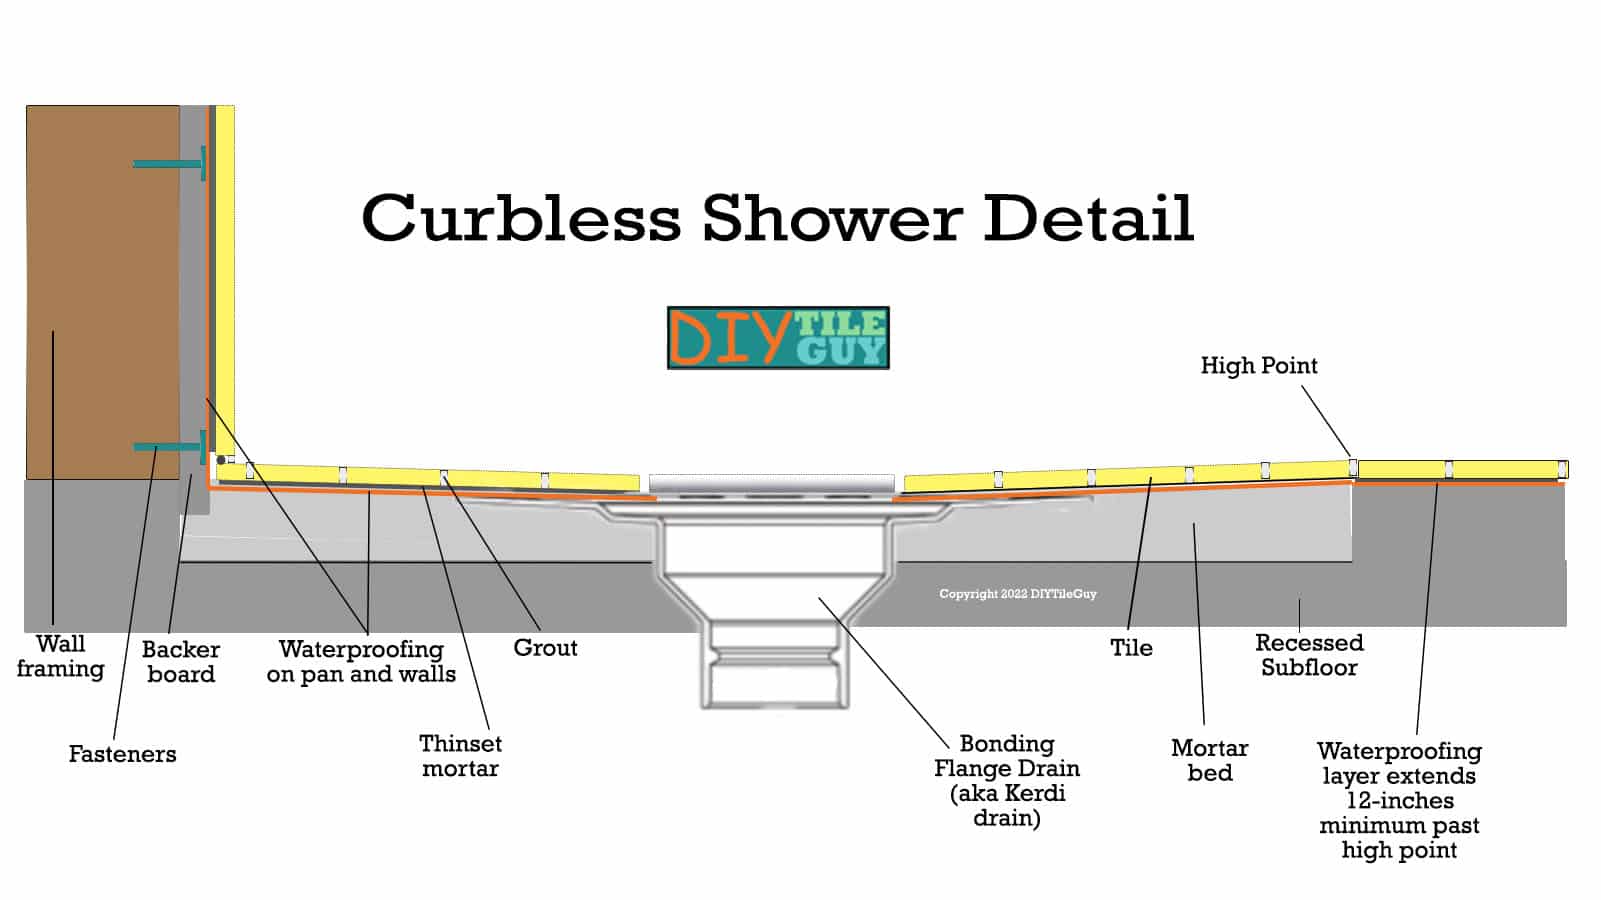
A waterproof barrier is essential to prevent water damage and mold growth. There are various methods for creating a waterproof barrier, but the most common options include a pre-sloped shower pan, a thinset membrane, or a shower liner.
A pre-sloped shower pan is a prefabricated unit designed with a built-in slope to direct water towards the drain. A thinset membrane is a liquid-applied product that creates a waterproof barrier when applied to the subfloor. This requires careful attention to detail to ensure proper adhesion and sealing. Lastly, the traditional shower liner is a sheet of rubber-like material that is installed underneath the tile.
Installing the Tile
Once the foundation and waterproofing are complete, you can start laying the tile. This involves choosing the right type of tile, preparing the mortar bed, and using proper techniques for tile installation.
Select tiles specifically designed for shower floors. Look for ceramic, porcelain, or natural stone tiles with a high coefficient of friction to prevent slipping. Before installing the tile, mix the mortar according to the manufacturer’s instructions. Begin laying the tile in the center of the shower floor and work outwards, ensuring that they are spaced evenly and centered on the drain.
Use a grout spacer to maintain consistent spacing between the tiles. Use a rubber mallet to gently tap the tiles into place, ensuring they are all level and flush. After the mortar has set, grout the joints between the tiles using a grout float. This step seals the gaps between the tiles and creates a waterproof barrier.

Image: www.diytileguy.com
Professional Tips for a Successful Installation
While the steps mentioned above provide a general guide, there are some essential tips from experienced tile installers that can make all the difference in your project.
Plan your layout: Before starting, create a layout plan on paper, taking into account the size of your shower, the drain location, and any existing features. This will ensure proper tile placement and minimal waste. Use the right tools: Investing in quality tools is essential for a professional finish. You’ll need a tile cutter, a trowel, a grout float, a level, and a rubber mallet. Don’t rush the process: Take your time and ensure every step is done correctly. Rushing the installation can lead to costly mistakes later on.
Troubleshooting and FAQs:
Q: What are some common mistakes to avoid when installing a tile shower floor?
A: Common mistakes include: Incorrectly leveling the subfloor, insufficient waterproofing, using the wrong type of mortar, inadequate tile spacing, and not grouting properly.
Q: How long does the mortar need to set before grouting?
A: The time required for mortar to set will vary based on the specific product. Refer to the manufacturer’s instructions for the recommended setting time.
Q: What should I do if a tile cracks during installation?
A: If a tile cracks, replace it immediately with a new tile.
Q: Can I install the tile over existing shower floor?
A: It’s usually not recommended to install new tile directly over an existing floor without careful consideration. The existing floor may be uneven or have underlying problems that could compromise the new installation.
How To Install A Tile Shower Floor
In Conclusion
Installing a tile shower floor can be a rewarding DIY project that adds a touch of luxury to your bathroom. By following the steps outlined in this article and paying close attention to the details, you can achieve a professional-looking finish. Remember, planning, preparation, and patience are crucial for success. If you’re still unsure about tackling this project, consider seeking help from a professional tile installer.
Are you ready to turn your bathroom into a tiled oasis? Share your thoughts and questions below!


/GettyImages-173599369-58ad68f83df78c345b829dfc.jpg?w=740&resize=740,414&ssl=1)


