Ever stood in a home improvement store, overwhelmed by the vast aisles of flooring choices, only to be stopped dead in your tracks when the salesperson asks, “How many square feet do you need?” This simple question can quickly become a stressful hurdle for homeowners tackling their first DIY flooring project. But fear not! Measuring square feet for flooring is actually a straightforward process. Armed with a measuring tape, a calculator, and this simple guide, you’ll be a flooring-savvy pro in no time.

Image: sohanifranko.blogspot.com
Understanding how to calculate square footage is crucial for any flooring project, whether you’re replacing carpets, installing hardwood, or laying down tiles. Getting the right amount of flooring ensures a seamless installation, prevents costly waste, and avoids the dreaded trip back to the store for more materials. We’re going to demystify this essential step and equip you with the knowledge to confidently measure your space and purchase the right amount of flooring.
What is Square Footage?
Square footage is a measurement of area, specifically the amount of space within a two-dimensional shape. In the flooring world, square footage tells you how much material you need to cover the floor of a room or an entire house. You calculate it by multiplying the length of the space by its width.
Essential Tools
Before you dive into measuring, gather the right tools. All you’ll need is a measuring tape and a calculator. While a basic calculator will suffice, consider using a smartphone app for quick calculations, especially if you’re dealing with irregular-shaped rooms.
Step-by-Step Guide to Measuring Square Footage for Flooring

Image: bcbestflooring.ca
1. Divide Your Space into Simple Shapes
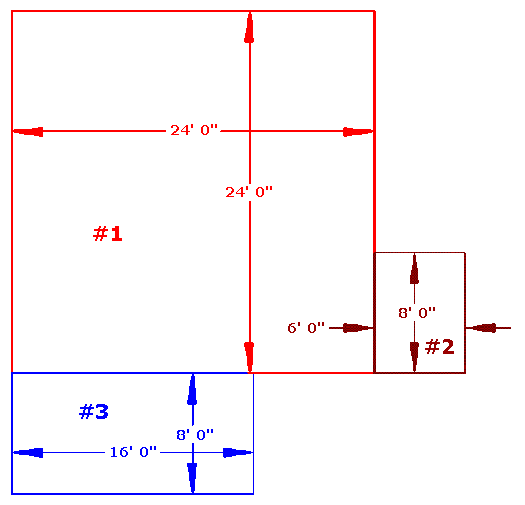
Start by visually dividing your space into simple geometric shapes, primarily rectangles and squares. If your room has an unusual shape, break it down into smaller, easier-to-measure sections. For instance, a room with a bay window might be divided into a rectangle and a semi-circle.
2. Measure Length and Width
For each rectangle or square, measure the length and width in feet. Use your measuring tape to find the longest and shortest sides of each section. Remember to take measurements at the widest and longest points within each rectangle or square to ensure an accurate representation of the space.
3. Calculate the Area of Each Section
Now comes the easy part: calculate the area of each section by multiplying its length by its width. For example, if your rectangular living room measures 15 feet long by 12 feet wide, its area would be 15 feet x 12 feet = 180 square feet. Repeat this calculation for every section in your space.
4. Account for Obstacles
Realistically, most rooms aren’t perfectly rectangular. You may have built-in cabinets, closets, or other obstacles that require adjustments. You can either measure them separately, subtract their area from the total square footage, or simply exclude them from your flooring calculations if they won’t be covered by the new flooring.
5. Add Up the Total Square Footage
Once you’ve calculated the area of each section, add them all together to get the total square footage of your flooring space. Remember to round up to the nearest whole number to ensure you have enough flooring material.
6. Consider Overlap and Waste
It’s always a good idea to add an extra 10-15% to your total square footage to account for cuts, waste, and potential errors. Flooring materials, particularly those with complex patterns, require careful planning and may result in some waste during installation. This extra footage safeguards against running out of materials in the middle of your project.
Dealing with Complex Shapes
For those tricky spaces like circles, triangles, or irregularly shaped rooms, there are a few additional steps to help you calculate the square footage:
Circles
For circles, you’ll need to measure its diameter (the distance across the circle through its center). Then divide the diameter by 2 to find the radius. Use the formula πr² (pi times the radius squared) to calculate the area. Remember that pi is approximately 3.14.
Triangles
To calculate the area of a triangle, you’ll need the length of its base and its height. The height is the perpendicular distance from the base to the opposite vertex. The formula is (1/2) * base * height.
Irregular Shapes
For irregularly shaped spaces, divide them into smaller rectangles, squares, or triangles and then calculate the area of each individual section. Add these areas together to find the total square footage of the irregular space.
Tips for Accurate Flooring Measurements
Here are a few extra tips to ensure your measurements are as accurate as possible:
- Measure twice, cut once: The old adage holds true for flooring measurements. Double-check your measurements to avoid costly mistakes.
- Use a level: Ensure your measuring tape is level to avoid variations or inaccuracies.
- Consider the layout: Think about how you want to lay your flooring and how cuts will be made to minimize waste.
- Factor in doorways: Measure doorway openings to determine whether your chosen flooring will need to be cut for a smooth transition.
- Check for floor slopes: If your floor has a noticeable slope, consider this factor when calculating your square footage.
How To Measure Square Feet For Flooring
Conclusion:
Measuring square footage for flooring may seem daunting, but with this guide, you’re equipped to conquer the task with confidence. Remember that accuracy is key to ensuring a seamless installation and preventing wasted materials. By dividing your space into simple shapes, carefully measuring each section, and adding a bit of extra footage, you’ll have the perfect amount of flooring to transform your home. So, go forth, measure, and unleash your inner DIY flooring expert!


/GettyImages-173599369-58ad68f83df78c345b829dfc.jpg?w=740&resize=740,414&ssl=1)


